
In looking for a new house, one of the big criterion I was looking for was space for a home gym. Although I am a trainer at CrossFit KoP, there are days where it would just be easier to bang out a workout at home. Now that we have a great home with a spacious 1-car garage, my goal is to create a home gym with the ability to park the wife's car in the garage.
The first thing I had to do was paint the garage. It came with the house unpainted, so I just got some Behr exterior semi-gloss white and got to work. It took just about 2.5 gallon cans to cover the whole garage (19'x10'x11').
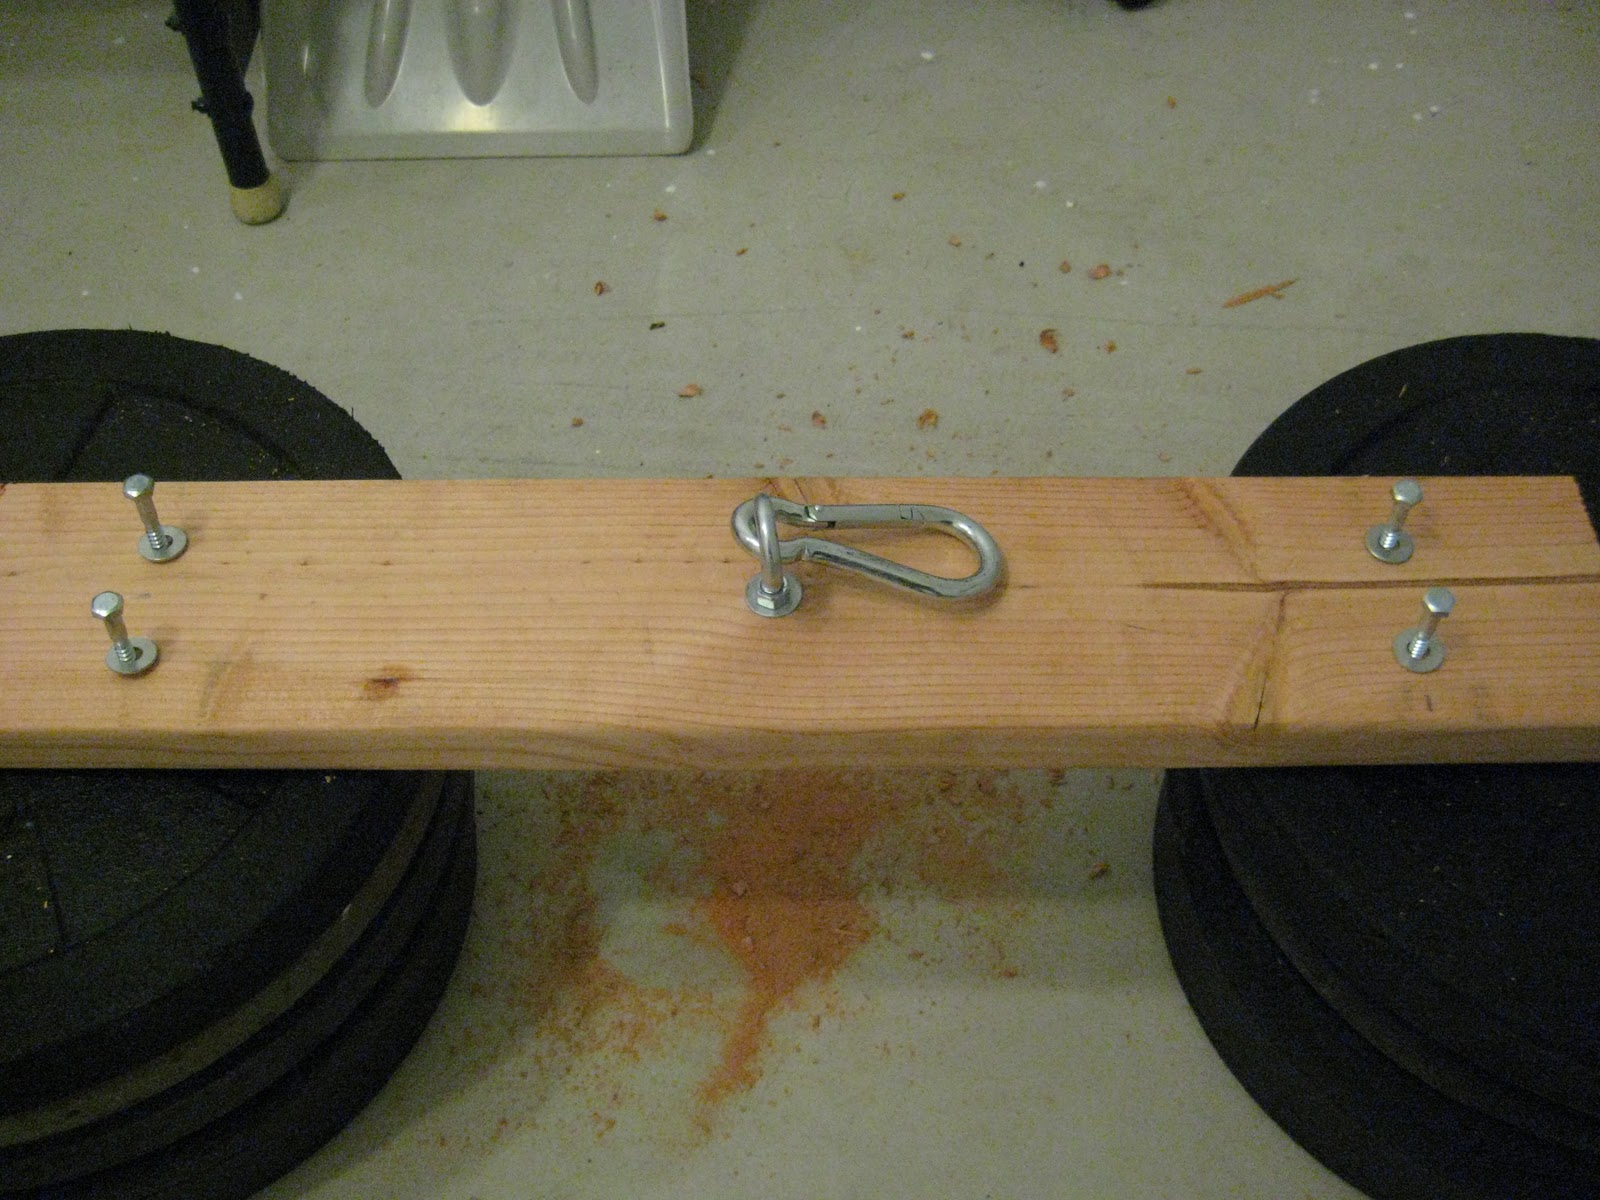 |
| a close up of one of the supports (resting on Rogue bumpers) |
updated 1/3/12 - general list of tools and hardware
TOOLS
stud finder (get one that finds the center of the stud, it will save you time - you get what you pay for, mine was $45 but way better than the $10 one I had originally)
drill and drill bits (standard set includes a variety of diameters)
socket wrench for lag screws
saw (if cutting the wood for your needs)
HARDWARE/supplies
2x6 piece of wood. I got an 8ft. length and cut it to size
lag screws/bolts - these grip the wood extremely well - you'll need 4 - 8 of these, depending on how many ceiling joists you have . Mine were 5/16ths of an inch in diameter and I used 8 total. They were 3.5" long
eye bolts - these are the circular things that hold the carabiners to the wood. 2 total and 3/8ths inch in diameter. Off the top of my head I forget how long, but just enough to go through the 2x8, so maybe 3 total inches including the eye
washers and nuts - get the same size as your eye bolts (mine were 3/8ths of an inch in diameter). these will distribute the load across the wood better. Use washers on your lag screws too. good idea is to get regular washers as well as "lock washers"
2 carabiners
something that you don't absolutely need but I did is to countersink holes in the wood so the nut and washer on top of the eye bolt was "in" the wood. For this you need special drill bits. Mine are "Ryobi forstner bits" from home depot.
there are a lot of great discussions on the CF forum, (mainpage) so check it out and do some searching around. Google is your friend!
Not much of a carpenter...could you post (a) all of the required supplies to build the supports and (b) all of the tools needed? Would feel more confident having everything on hand and then trying to tackle the project.
ReplyDeleteAnonymous, you don't need much, but exact dimensions will depend on your setup...here's a general list to get you going:
ReplyDeleteTOOLS
stud finder (get one that finds the center of the stud, it will save you time - you get what you pay for, mine was $45 but way better than the $10 one I had originally)
drill and drill bits (standard set includes a variety of diameters)
socket wrench for lag screws
saw (if cutting the wood for your needs)
HARDWARE/supplies
2x6 piece of wood. I got an 8ft. length and cut it to size
lag screws/bolts - these grip the wood extremely well - you'll need 4 - 8 of these, depending on how many ceiling joists you have . Mine were 5/16ths of an inch in diameter and I used 8 total. They were 3.5" long
eye bolts - these are the circular things that hold the carabiners to the wood. 2 total and 3/8ths inch in diameter. Off the top of my head I forget how long, but just enough to go through the 2x8, so maybe 3 total inches including the eye
washers and nuts - get the same size as your eye bolts (mine were 3/8ths of an inch in diameter). these will distribute the load across the wood better. Use washers on your lag screws too. good idea is to get regular washers as well as "lock washers"
2 carabiners
something that you don't absolutely need but I did is to countersink holes in the wood so the nut and washer on top of the eye bolt was "in" the wood. For this you need special drill bits. Mine are "Ryobi forstner bits" from home depot.
there are a lot of great discussions on the CF forum, (mainpage) so check it out and do some searching around. Google is your friend!
Got all of my supplies and then realized I got some wrong stuff. I got flat end lag screws when they need to be pointy to screw into the joints. Then, I got a screw in eye bolt when it looks like you used a flat ended one. Back to Lowe's. Lol.
ReplyDeleteExcellent method! I just hung my rings, finished yesterday and followed the method above pretty much to a "t". Everything seems to be working as advertised. I used 4 inch lag screws that were 3/8 vice 5/16 and I used 8 total. I also made the eye bolts countersink. Worked great.
ReplyDeleteHey, thanks for the detailed walkthrough. I just picked up the equipment from Home Depot and will install tonight. I have one question though: do you have 12", 18" or 24" joists in this video? The reason I ask is to figure out if the eye bolt is directly underneath a central joist, at the midpoint of the two joists on the end. Is this why you used a flat-tipped eye bolt, so that the joist wouldn't interfere?
ReplyDeleteThis question may be a non-issue when I start looking at my ceiling this evening, but it's the one issue that I foresee right now. Thanks!
Hey Jeremy! The joists are spaced 24" but it is a non issue bc the flat eye,bolt is recessed into the wood, so it actually doesnt go into the ceiling. It was just a personal preference. Hopefully that helps!
DeleteHey Chris. Awesome set-up. I've been thinking about putting in some rings myself and really appreciate your tutorial. Just curious, how is everything holding up? I'm a little skeptical about putting such a load on the lag screws into the joist. Have you had any issues with the screws pulling out? Thanks!
DeleteJon, thanks for the feedback! Things are fine, solid as a rock. I'm always test the weight first, but honestly they don't even creak and with 8 lags in there, it's going to take someone much bigger than me to even budge it.
Delete8/29/12
ReplyDeleteDear Chris,
I'm afraid I see a great design flaw in the suggested method to hang the rings. Any structural design must or should have a certain safety "design factor". In major projects such as steel buldings some codes require a factor of 5x. I doubt that there are any codes one has to comply with in this situation. However a design factor of 3x may be safe enough for this application. In other words, if a 200# person (not to mention the possibility that two 200# persons "horsing around") hangs from only one ring, the design must then be of 3x200 or 600# for each ring, however remote this occurrence. In the unlikely possibility that 2- 200# persons hang from the one ring, the design load must be 400# x 3 or 1,200#, (reason for design factors).
A 2x6 piece of wood (most will use pine-stud grade), is only 1 1/2" deep. By the time you countersink the assembly for the nut and washer (and assuming you accidentally didn't drill deeper-which would be exponentially worse), you end of with only 1" of "meat" to resist the potential "static" weight applied. (A dynamic force is more critical, as when swinging, or if for instance two persons jump up and down while hanging from the ring).
Where the joists above are 16" o.c. and the 2x6 only 30" long, the lag bolts are 32" apart (there is no vertical support at the center joist since the eyebolt is countersunk under the middle 2x joist). But even if you spanned 3 joist lengths (50" long piece of 2x6), and used 8 lag bolts into the joists (2 per joist), the design is an overkill because the weakest link is still the only 1" of "meat" of wood (drilling for the countersink weakens the bending resiting stresses), supporting the force resisted by the eyebolt's washer at center.
The problem is improved if we used a 3"x6" piece of wood (instead of a 2x6), and better yet if there no countersinking to the 3x6 (the full cross sectional reistance of the lumber is used), and better yet if the lumber is 48" long (with 8 lag bolts), where the supports are now only 8" from the eyebolt. Only one lag screw would be required at the end supports only for stability. Small damage is made to the sheetrock which is easily repaired. All of this is assuming that the lumber has no serious defects or imperfections which would not help any. Better to repair the sheetrock later than end up in the hospital now. Maybe I missed something, if so please let me know.
Jim
Hey Jim,
DeleteIt sounds like you have experience in construction or related areas. Although I was an engineering major for just a bit in college, I don't claim to have any expertise in construction or design. So you're probably right in all of your calculations, and heavier dudes should be taking this into consideration. For me as a light guy, this setup has been working. I do hear you about the eye bolt being the weak link in this...I wonder what the area of the washer (even in a countersunk hole) does to increase the load capacity. i.e. bigger washer = more area for the eye bolt to rely on. Anyway, hopefully people realize that they should be consulting a number of different resources and ultimately, know that everything is a risk. Thanks for the detailed feedback!
Hi Chris,
ReplyDeleteYou're right. I'm a retired registered architect (now inactive), and my son asked to check your site as he lives in a new house where he wants to install his second gym, rings being only a part of it. I helped him with his first installation which is completely different, but now he wants more height and so is contemplating hanging as you suggest. Your system is OK so we'll do something very similar.
However, the potential problems are not related only to one's or weight alone. In your case (I believe you said you weigh 150#), when you're just hanging still from the rings, half your weight (75#), is being supported by each ring and each eyebolt. I don't know what fancy routines you do while excercising, but it's possible that you, or anyone else, could try to swing into a handstand. If you lose your balance you could come down hard and fast and your weight distribution is not necessarily now 50-50 but could then be as much as 20-80% on one of the rings. Multiply half your weight by the momentum created by half your weight (wasn't very good at calculus), but the force created could be twice or three times depending on the speed of your descent. That would be about 150# to 225# more or less. Not much, but much more than 75#. It's easy to do the math with someone weghing twice as much.
The size of the washer does make a difference but if a !" hole has been made, a 1" washer is the max. you could use when countersinking. The load applied, is being resisted by the nut which then transfers it to the washer which then transfers it to the wood fibers (in tension) of the plank underneath, and this where and when failure is more likely to occur when using a 2" thick plank.
I could sleep better at night if I was one who had installed the wood plank spanning over three studs only (32"), I would disassemble and drill a new completely through hole (for the eyebolt) in the center between the first two joists, using perhaps not a large washer but a metal plate as large as possible (washer thickness), which distributes whatever load more evenly on the plank, making sure to use non-slip washers so that the nut does not losen with any movement. At the same time drive through two new lag bolts where the eyebolt was before (now the supports are 8" each side to the joist.)
For anyone having installed the plank over four studs (48"), the same could be done and this time center the eyebolt between the center two joists. Rub some Elmer's glue when reinstalling the bolts in the same location.
I don't know, Chris, with me, "an ounce of prevention......
JIm
it all makes sense. It would be much stronger to drill that eye bolt through a stud if possible. Folks should take that into consideration if they can do it. Thanks for the input Jim, maybe we should go into business together: you draw up the plans and I'll do the grunt work! haha
Delete